OPNIC Installation Guide
The following page describes the installation procedure of an OPNIC - including connectivity to the OPX1000, configuration, and initialization as part of the QM Open Acceleration Stack.
Components
OPNIC Hybrid Link - Physical Components
- OPNIC: OP Network Interface Card, installed in the host server's PCIe port
- Server: Server / Computer driving the classical computation. Also referred to as the "OPNIC host server"
- OPX1000: Ultra low latency Quantum control and readout controller
Server Installation
Important: Before proceeding with OPNIC installation, you must first complete the server setup. Follow the detailed instructions here to install all required dependencies.
OPNIC Hybrid Link Software & Firmware Components
Software on the server consists of three open-source software components that are required to be installed on the server:
- OPNIC Driver: A kernel driver for the OPNIC PCIe card
- OPNIC SDK: A shared library that is used by user’s application on the server
- OPNIC CLI tool: A CLI interface for managing the OPNIC (for example, a one-time sync with QOP, updating card FW, etc.)
Warning
Avoid running sudo apt upgrade on the server, as it may trigger unintended driver updates that are incompatible with the provided OPNIC drivers.
OPNIC Installation in the host server
Step 4 can be used to update the OPNIC firmware. If the system was previously configured, you can skip directly to step 4.
Step 1: OPNIC Mechanical Assembly
-
Power down the server completely and disconnect it from all power sources, then install the OPNIC in the server's designated PCIe slot
- Mechanical assembly manual example for tray-based riser server OPNIC Assembly Guide
- Server types and PCIe mounts may differ; always follow the manufacturer’s instructions for your model.
-
Power on the server and update the PCI device database:
- Connect the server to the internet.
- Run the following command:
sudo update-pciids - Verify the OPNIC is properly recognized by running
lspciand confirm you see the device listed as: Serial controller: Quantum Machines OPNIC
Step 2: OPNIC Connection Schema
OPNIC communication requires an Ethernet connection between the OPX1000 chassis and the server and an optical connection between the OPNIC and the OPX1000 chassis. Please follow these guidelines:
- Make sure slot 1 is populated by an FEM or contact Quantum Machines support for an alternative connectivity configuration.
- Connect the 2 QSFP-MPO adapters to the relevant ports in the OPNIC.
-
Connect the MPO optical cables from the OPNIC to the OPX1000 according to the diagram:
-
Make sure to connect Comm 2 to the right OPNIC port (orientation according to the sketch).
-
Make sure both MPO optical cables are identical and of the same length.
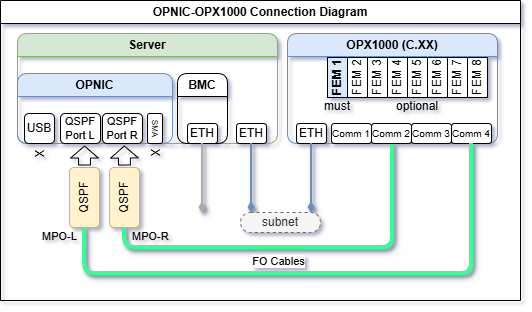
Note
The sketch illustrates the connection to a Rev. C chassis.
If the OPNIC is connected to a Rev. B chassis, use the provided adapter kit, or use a patched MPO optical cables, which are sometimes pink.
-
-
Network Communication - Ethernet connections should be based on the specific site/IT connectivity guidelines.
Make sure you can ping the OPX1000 from the server. The easiest way is to ensure they are on the same subnet. Alternatively, routing can be defined, please contact your IT department for support.
Step 3: OPNIC Drivers Installation and Update
- Copy the OPNIC software package provided by Quantum Machines into the server
-
Add execute permissions:
-
Install Driver:
-
Install SDK:
-
Verify installation of opnic libraries:
And verify that the following files are present:libopnic.so,libopnic-cuda.so. -
Install CLI:
Step 4: OPNIC Firmware Update
The OPNIC firmware consists of two separate images which can be updated using the OPNIC CLI tool:
FPGA Image: The bitfile that is loaded into the OPNIC FPGA. This image is responsible for the PCIe interface and the communication with the OPX.
PLL configuration: The OPNIC clock configuration, will rarely update.
-
Check the version by running:
-
Validate that the output indeed shows the latest FPGA and PLL images:
-
Update by flashing the latest image when versions are outdated:
-
Once the flash has ended, reset the card by running:
-
Restart the server:
-
Firmware update is supported by new drivers.
- Follow the driver installation steps described in Step 3.
- Repeat Firmware validation upon completion.
Appendix 1: Server Installation
OPNIC host server minimal configuration:
-
OS:
- Ubuntu Ver. 24.04
- Fedora CoreOS 42.2x with GNU compiler 15.2.1
-
GCC13
- CMake ≥ 3.25.5
- make
- NVIDIA Open kernel drivers compatible with GPU installed
- CUDA toolkit 12-8
Recommended Installation Steps
Warning
- Server‑specific installation procedures may vary by vendor and hardware configuration. When in doubt, consult the system vendor.
- The following installation notes apply to Ubuntu on Aarch64 or x64 systems. Make sure to install the NVIDIA drivers that match your configuration. Applying the wrong configuration may stall your system.
1. Linux installation
- Download and install Ubuntu 24.04 ARM64 Server from: link
- Create a bootable USB drive (disk‑on‑key) and install the OS using a preferred USB imaging tool (e.g., Rufus or Ventoy).
2. Install GCC13
Run the following commands:
sudo apt install software-properties-common -y
sudo add-apt-repository ppa:ubuntu-toolchain-r/test -y
sudo apt update
sudo apt install gcc-13 g++-13 -y
# make gcc13 the default version
sudo update-alternatives --install /usr/bin/gcc gcc /usr/bin/gcc-13 100
sudo update-alternatives --install /usr/bin/g++ g++ /usr/bin/g++-13 100
# verify
gcc --version
cc --version
Update and run bashrc:
3. Install cmake
Run the following commands:
# download cmake installer
wget https://github.com/Kitware/CMake/releases/download/v3.31.6/cmake-3.31.6-linux-aarch64.sh

# grant execution permission
sudo chmod +x cmake-3.31.6-linux-aarch64.sh

# run it. agree to the license and type 'Y' when it asks if you want to install it in the default folder
./cmake-3.31.6-linux-aarch64.sh

# move it to /opt
sudo mv cmake-3.31.6-linux-aarch64/ /opt/cmake-3.31.6

# add symbolic links in /usr/local/bin to point to the cmake you just installed
sudo ln -sf /opt/cmake-3.31.6/bin/ccmake /usr/local/bin/ccmake
sudo ln -sf /opt/cmake-3.31.6/bin/cmake /usr/local/bin/cmake
sudo ln -sf /opt/cmake-3.31.6/bin/cmake-gui /usr/local/bin/cmake-gui
sudo ln -sf /opt/cmake-3.31.6/bin/cpack /usr/local/bin/cpack
sudo ln -sf /opt/cmake-3.31.6/bin/ctest /usr/local/bin/ctest

# test
cmake --version
4. Install Ninja and make
Run the following command:
5. Install and update NVIDIA driver
Warning
Make sure to install the NVIDIA drivers that match your configuration. Applying the wrong configuration may stall your system.
Run the following commands to update the system and install the NVIDIA optimized Ubuntu kernel variant and reboot:
sudo DEBIAN_FRONTEND=noninteractive apt purge linux-image-$(uname -r) linux-headers-$(uname -r) linux-modules-$(uname -r) -y
sudo apt update
sudo apt install linux-nvidia-64k-hwe-24.04 -y
sudo reboot now
Note
Running GH200 may require GPU memory onlining (required for unified memory architecture) - consult vendor:
Updating NVIDIA driver:
sudo apt-get install linux-headers-$(uname -r)
wget https://developer.download.nvidia.com/compute/cuda/repos/ubuntu2404/sbsa/cuda-keyring_1.1-1_all.deb
sudo dpkg -i cuda-keyring*.deb
sudo apt-get update
sudo apt-get install cuda-toolkit-12-8 -y
sudo apt install nvidia-driver-590-server-open -y
sudo reboot
Check installation with:
To check and determine whether the CPU and GPU memory subsystems are up and functional, run the following commands
map nvcc:
6. Validate correct gcc version
This step ensures the correct GCC version is used, as certain installations may inadvertently trigger a rollback to an earlier version
1. Linux installation
- Download and install Ubuntu 24.04.4 AMD64 Server from: link
- Create a bootable USB drive (disk‑on‑key) and install the OS using a preferred USB imaging tool (e.g., Rufus or Ventoy).
2. Install GCC13
Run the following commands:
sudo apt install software-properties-common -y
sudo add-apt-repository ppa:ubuntu-toolchain-r/test -y
sudo apt update
sudo apt install gcc-13 g++-13 -y
# make gcc13 the default version
sudo update-alternatives --install /usr/bin/gcc gcc /usr/bin/gcc-13 100
sudo update-alternatives --install /usr/bin/g++ g++ /usr/bin/g++-13 100
# verify
gcc --version
cc --version
Update and run bashrc:
3. Install cmake
Run the following commands:
# CMake 3.31.6 Installation
wget https://github.com/Kitware/CMake/releases/download/v3.31.6/cmake-3.31.6-linux-x86_64.tar.gz
tar -xzf cmake-3.31.6-linux-x86_64.tar.gz

# move it to /opt
sudo mv cmake-3.31.6-linux-x86_64 /opt/cmake-3.31.6

# Create System-wide CMake Symlinks
sudo ln -sf /opt/cmake-3.31.6/bin/cmake /usr/local/bin/cmake
sudo ln -sf /opt/cmake-3.31.6/bin/cpack /usr/local/bin/cpack
sudo ln -sf /opt/cmake-3.31.6/bin/ctest /usr/local/bin/ctest
sudo ln -sf /opt/cmake-3.31.6/bin/ccmake /usr/local/bin/ccmake
sudo ln -sf /opt/cmake-3.31.6/bin/cmake-gui /usr/local/bin/cmake-gui

# test
cmake --version
4. Install Ninja and make
Run the following commands:
5. Install and update NVIDIA driver
Warning
Make sure to install the NVIDIA drivers that match your configuration. Applying the wrong configuration may stall your system.
NVIDIA CUDA Repository Setup
wget https://developer.download.nvidia.com/compute/cuda/repos/ubuntu2404/x86_64/cuda-keyring_1.1-1_all.deb
sudo dpkg -i cuda-keyring_1.1-1_all.deb
sudo apt update
NVIDIA Drivers 575 Installation
sudo apt-get install nvidia-kernel-open-575 cuda-drivers-575 -y
# CUDA Toolkit 12.8 Installation
sudo apt install cuda-toolkit-12-8 -y
CUDA Environment Setup
grep -qxF 'export PATH=/usr/local/cuda-12.8/bin:$PATH' ~/.bashrc || echo 'export PATH=/usr/local/cuda-12.8/bin:$PATH' >> ~/.bashrc
grep -qxF 'export LD_LIBRARY_PATH=/usr/local/cuda-12.8/lib64:$LD_LIBRARY_PATH' ~/.bashrc || echo 'export LD_LIBRARY_PATH=/usr/local/cuda-12.8/lib64:$LD_LIBRARY_PATH' >> ~/.bashrc
source ~/.bashrc
Check installation with:
To check and determine whether the CPU and GPU memory subsystems are up and functional, run the following commands
6. Validate correct gcc version
This step ensures the correct GCC version is used, as certain installations may inadvertently trigger a rollback to an earlier version