OPX & OPX+ Hardware Specifications
This page describes the hardware components of the OPX & OPX+.
Technical specifications
The table below groups the main characteristics of the OPX & OPX+ .
| Property | Value |
|---|---|
| Input Voltage | 100-240 V, 50-60 Hz |
| Power specifications | 300 W |
| Dimensions (width, depth, height) | 44.4 x 49.9 x 8.8 cm |
| Rack Dimensions | 19 inch, 2U |
| Operational Temperature Range | 0-40 degC |
Port specifications
The table below groups the main characteristics of the OPX & OPX+ ports.
| OPX ports | Analog outputs | Analog inputs | Digital outputs | External trigger |
|---|---|---|---|---|
| Voltage settings | ±0.5 V or 4 dBm | ±0.5 V or 4 dBm | 3.3 V (LVTTL) | 3.3V (LVTTL) |
| Bandwidth | ±350 MHz | ±350 MHz | pulse width > 2ns | pulse width > 4ns |
| Resolution | 16 bit DAC | 12 bit ADC | 1 bit | 1 bit |
| Impedance | 50 Ω | 50 Ω | High Z | High Z |
Note
If the external trigger requires a low impedance port, its is advised to add a 50 \(\Omega\) terminator to the line. See Guide on External Triggering for more details regarding the usage of external triggering in the OPX.
OPX+ Block Diagram
The simplified block diagram model for the OPX+ can be seen below.

Analog Input Stage
The signals acquired by the OPX using the analog input channels are first passed through an analog input stage and then digitized. Here we discuss the voltage limits, gain and offset calibrations that can be applied to the signal to be digitized.
Acquiring analog signals with the OPX & OPX+
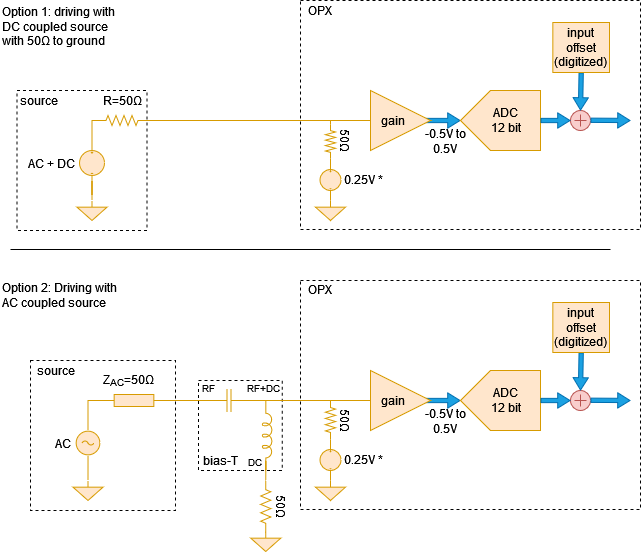
The signal source can be either AC or DC coupled:
If the signal source is DC coupled and has 50ohm DC resistance to ground, it can be directly connected to the analog input. This can be seen in Option 1 of Fig. 1
If the signal source is AC coupled and does not have a 50ohm resistance to ground, a bias T is needed in order to bias the input amplifier. The required setup can be seen in option 2 of Fig. 1. In this case, the source will still need to have a 50ohm AC impedance throughout its bandwidth for proper operation.
Important
The OPX & OPX+ input has a common-mode voltage of 0.25V when measured with 50ohm.
Setting the voltage gain
The voltage gain can be set by adding a "gain_db" field to the "analog_inputs" field
of the controller in the config.
It can take integer values between -12 dB to 20 dB.
Here we show an example with the relevant fields:
config = {
    'version': 1,
    'controllers': {
        'con1': {
            'analog_inputs': {
                1: {'offset': 0.0, 'gain_db': -1},
                2: {'offset': 0.0, 'gain_db': 1},
            }
        }
    },
}
Warning
When the gain is set to max attenuation, -12dBm, the maximal power that can be input to the ADC without significant distortion is 16dBm or 4Vpp.
Please avoid exceeding 4dBm (1Vpp) without attenuation. This may damage the controller.
Note
When changing the gain, the input DC offset needs to be recalibrated.
Back Panel Description
The back panel of the OPX is the interface for control, power and connectivity to other devices. The following section details the back panel of the OPX and the OPX+ controllers. Click on the relavnt
Important
Some early back panels might have different labels. These which might appear different are marked with an astrix. The correct labels are the ones shown on this page.
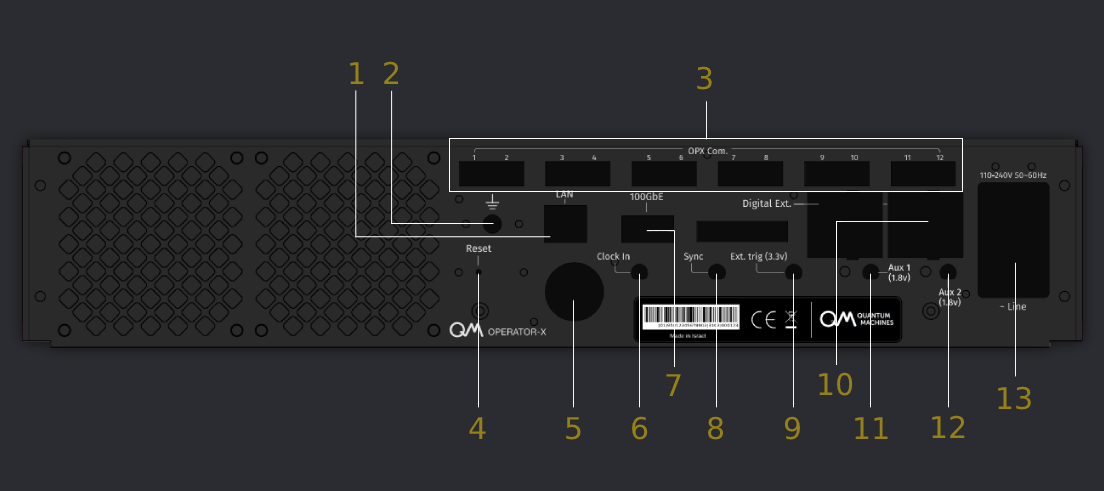
Back Panel Description
| Number | Label | Description |
|---|---|---|
| 1 | LAN | LAN port for network connection to router |
| 2 | Ground symbol | Chassis earth ground |
| 3 | OPC Com. | Inter-OPX optical connectivity (for a multi-OPX system) |
| 4 | Reset | Factory reset (currently disabled) |
| 5 | nan | 2 USB ports |
| 6 | Clock in | External clock reference (10,100,1000 MHz) |
| 7 | 100GBE | Not in use |
| 8 | Sync | Sync from OPT (for a multi-OPX system) |
| 9 | Ext. trig (3.3V)* | External trigger |
| 10 | Digital Ext. | Connection for OPD - digital input/output extension |
| 11 | AUX 1 (1.8V)* | QSync |
| 12 | AUX 2 (1.8V)* | QSync |
| 13 | Line | Power inlet and switch |
The OPX has several back panel versions. Click on the toggle keys to view them.
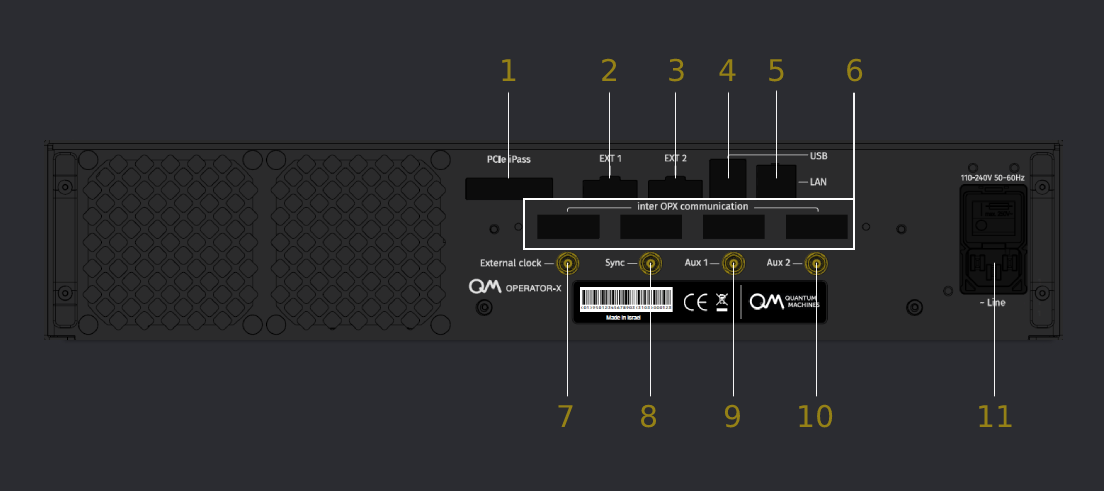
Back Panel Description
| Number | Label | Description |
|---|---|---|
| 1 | PCIe | Connection to the server |
| 2 | Ext1 | Not in use |
| 3 | Ext2 | Not in use |
| 4 | USB | 2 USB 3.0 ports. Server connects to the lower one |
| 5 | LAN | Not in use |
| 6 | Inter OPX communication | 10 optical ports for fast communication between OPX's |
| 7 | External clock | External clock reference (10,100,1000 MHz) |
| 8 | Sync | Synchornization with the OPT |
| 9 | Aux1 | External trigger input |
| 10 | Aux 2 | Not in use |
| 11 | Line | Power inlet and switch |
Important
Some early back panels might have different labels. However, the correct labels are the ones shown on this page.
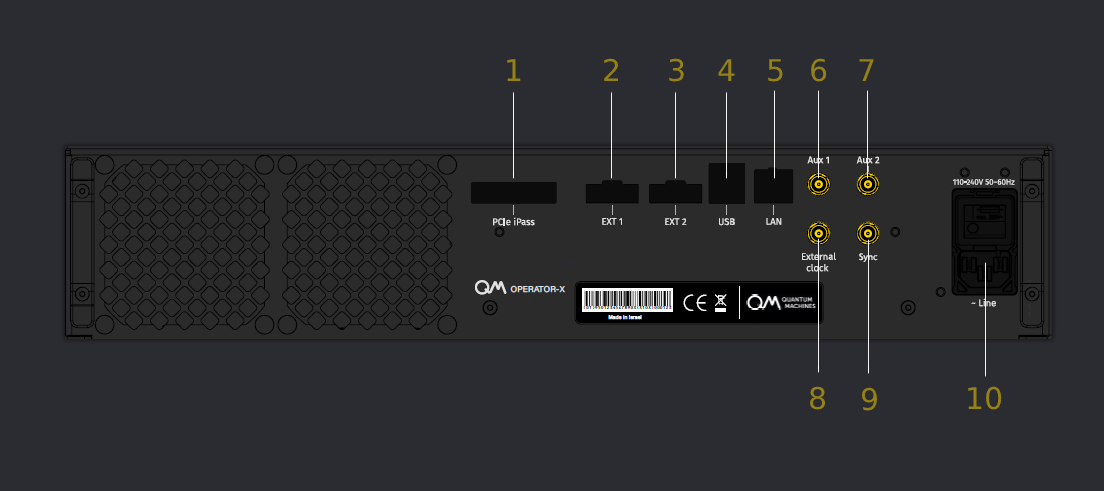
Back Panel Description
| Number | Label | Description |
|---|---|---|
| 1 | PCIe | Connection to the server |
| 2 | Ext1 | Not in use |
| 3 | Ext2 | Not in use |
| 4 | USB | 2 USB 3.0 ports. Server connects to the lower one |
| 5 | LAN | Not in use |
| 6 | Aux1 | External trigger input |
| 7 | Aux2 | Not in use |
| 8 | External clocl | External clock reference (10,100,1000 MHz) |
| 9 | Sync | Not in use |
| 10 | Line | Power inlet and switch |