QOP Installation Guide
This guide outlines the steps for installing a QOP package on either an OPX+ or OPX1000 device.
If you are looking for the hardware installation guides, please follow the following links:
Warning
Please allow the booting process to finish after each step, and only move on to the next step once the device has finished booting (Appears green and in the "Operational" state).
Installation Procedure
- Open a web browser on a computer that has network access to the device you wish to update.
- In the address bar, enter the IP address typically used to connect to your device. This should open the Admin Panel.
- Based on your QOPA version and OPX type, refer to the instructions below and install each intermediate version until you reach the desired release.
Select the desired cluster on the Cluster Overview page or from the sidebar. The current QOP version is displayed in the sidebar on the left.
OPX1000
Please use the following selector tool to determine the correct steps for installing the latest QOP version. For information on how to install each specific package, please refer to the detailed instructions below.
QOP_INSTALL_TOOL_OPX1000
Check the current BSP version
How to check BSP version
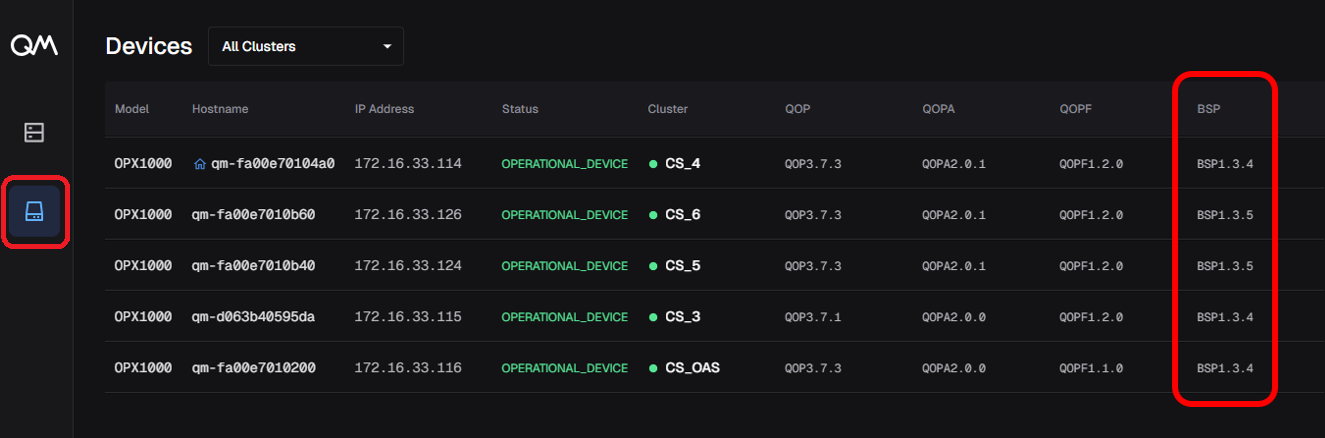
Navigate to the Devices section in the leftmost part of the sidebar. The BSP version for each device is displayed in the right-most column.
Updating QOP, QOPA, or QOPF
The update flow is the same for all packages:
- Select the cluster from the sidebar.
- Navigate to the Versions page.
- Click the Upload Version button in the top right corner.
- Follow the on-screen instructions to upload the desired package. It will be automatically detected as QOP, QOPA, or QOPF.
- Once the version is uploaded, hover over the newly uploaded version and click
Install.
Note
For QOPF instalation please carefully read the instructions in the pop-up window before proceeding.
OPX+
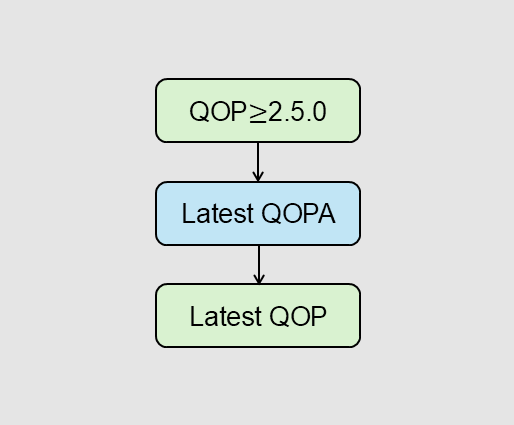
- Select the cluster from the sidebar.
- Navigate to the Versions page.
- Click the Upload Version button in the top right corner.
- Follow the on-screen instructions to upload the desired QOPA package.
- Once the version is uploaded, hover over the newly uploaded version and click
Install. -
Once the QOPA update is finished, repeat the steps above to upload and install the desired QOP package.
Important note
For the best performance, please make sure to update the QOPA version to the latest one.
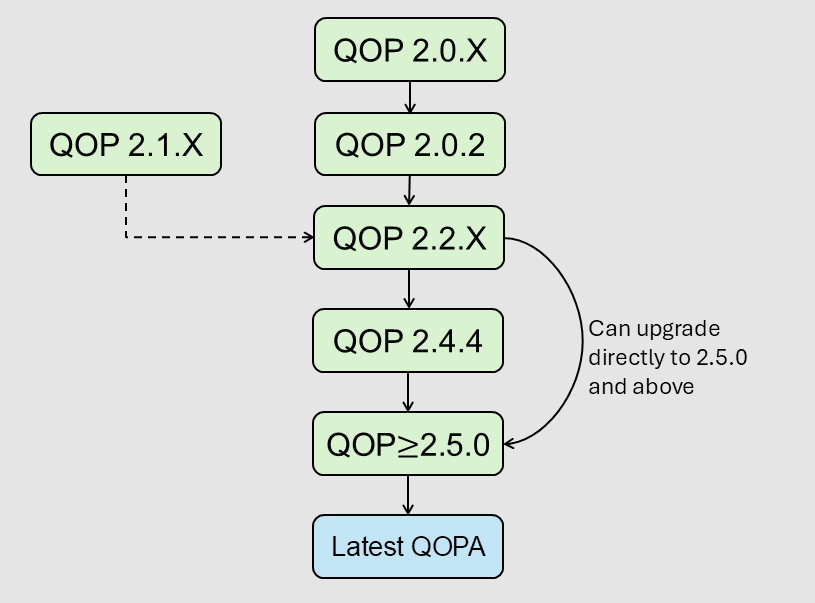
- Select the cluster from the sidebar.
- Navigate to the Versions page.
- Click the Upload Version button in the top right corner.
- Follow the on-screen instructions to upload the desired QOP package.
- Once the version is uploaded, hover over the newly uploaded version and click
Install.
You can find your current QOP version displayed in the top right corner of the screen.
OPX1000
Please use the following selector tool to determine the correct steps for installing the latest QOP version. For information on how to install each specific package, please refer to the detailed instructions below.
QOP_INSTALL_TOOL_OPX1000
Check the current BSP version
How to check BSP version
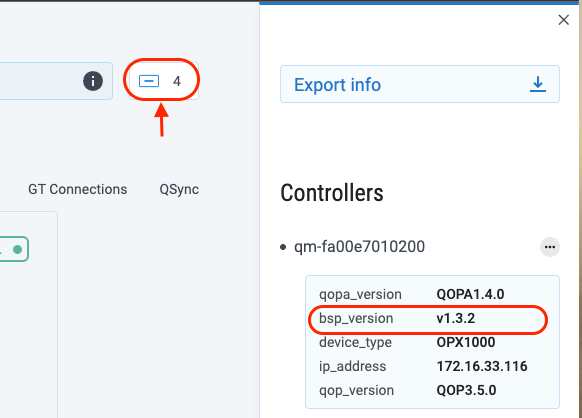
In the admin panel click on the controller icon at the top right of the page in the topology page
- In the Admin Panel, navigate to
Preferences > QOP. - Click the blue
Uploadbutton and follow the on-screen instructions to upload the desired QOP package. - Once the version is uploaded, select the target cluster (if applicable) from the drop-down menu.
- Hover over the newly uploaded version and click
Install.
- In the Admin Panel, navigate to
Preferences > QOPA. - Click the blue
Uploadbutton and follow the on-screen instructions to upload the desired QOPA package. - Once the version is uploaded, select the target cluster (if applicable) from the drop-down menu.
- Hover over the newly uploaded version and click
Install.
- In the Admin Panel, navigate to
Preferences > QOPF. - Click the blue
Uploadbutton and follow the on-screen instructions to upload the desired QOPF package. - Once the version is uploaded, select the target cluster (if applicable) from the drop-down menu.
- Select the desired device(s) according to their hostnames.
- Hover over the newly uploaded version and click
Install. - Carefully read the instructions in the pop-up window. Once ready, follow the on screen instructions to start the installation.
OPX+
- In the Admin Panel, navigate to
Preferences > QOPA - Click the blue
Uploadbutton and follow the on-screen instructions to upload the desired QOPA package. - Once the version is uploaded, select the target cluster from the drop-down menu.
- Hover over the newly uploaded version and click
Install. - Once the QOPA update is finished, navigate to
Preferences > QOP - Click the blue
Uploadbutton and follow the on-screen instructions to upload the desired QOP package. - Once the version is uploaded, select the target cluster from the drop-down menu.
-
Hover over the newly uploaded version and click
Install.Important note
For the best performance, please make sure to update the QOPA version to the latest one.
- In the Admin Panel, navigate to
Preferences > Versions. - Click the blue
Uploadbutton and follow the on-screen instructions to upload the desired QOP package. - Once the version is uploaded, select the target cluster from the drop-down menu.
- Hover over the newly uploaded version and click
Install.
Important notes
- The exact steps may vary slightly depending on your QOP Admin (QOPA) version.
- Some versions may not display a progress bar during installation.
- After installation is complete, press
Ctrl + F5to refresh the page and clear the cache. - If any step fails, try repeating it a few times. If the issue persists, please contact QM support for assistance.